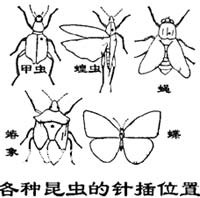
1. Needle-dried specimen
Generally, adult insects are made into pin-dried specimens, which can be stored permanently without any treatment. The method is to take the specimen out of the paper bag (if the specimen is dry, it needs to be placed in a softening tank to soften), and insert it with an insect needle (different types of insect needles are selected depending on the size of the insect). The needle insertion site is usually at The center of the thorax, but the location of needle insertion may be different depending on different insects. Coleoptera is inserted about 1/4 of the base of the right wing, Hemiptera is inserted on the small scutellum, Diptera is inserted on the right side of the mesothorax, and Locust is inserted on the right side of the pronotum extending forward.
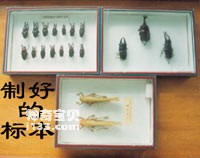
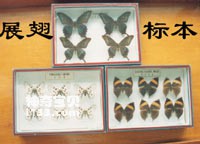
After the specimen is inserted, it is necessary to adjust the posture. Insert the insect on the adjustment board so that the insect body is in contact with the board. Then use a needle to arrange the antennae, legs, tail, ovipositor, etc., so that the posture of the specimen is as close as possible to How it is in life. Be symmetrical. The feet are generally stretched forward with the front foot forward, and the middle and rear feet placed backward. Adults such as Lepidoptera and dragonflies also need to spread their wings on the wing-spreading plate, so that the rear edge of the forewings is perpendicular to the body, the hind wings are spread upward, slightly pressed under the forewings, and then pressed with paper strips. After the insects in good posture are dried and the paper strips are removed, the specimens are made. Finally, insert two small labels, one with the collection location, collection date, and collector's name. Write the name of the insect on a sheet. If you can't pronounce the name, you can ask an insect taxonomist. The height of the specimen and the label part should be consistent. Place the specimen neatly in the specimen box and put camphor in the box to avoid insect infestation.
2. Preparation of larval specimens
In addition to soaking in alcohol, larvae can also be made into inflated specimens. The preparation method is to kill the larvae with a poison bottle, place the larvae on the waste paper with the head inward and the anus outward, use a pencil or a dissecting needle with a wooden handle to first press out the feces from the head to the back, and then use force to remove all the internal organs of the specimen. Extrude it from the anus. Use scissors or tweezers to remove the extruded material (be careful not to damage the anus), leaving only a layer of empty skin. Tie one end and use an air bag to inflate the empty skin at the other end until it returns to its original state. After taking the shape, slowly bake it next to an electric stove. After removing the binding wire, insert a matchstick into the body, and then insert an insect needle into the stick to form an inflated specimen.
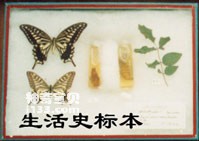
3. How to prepare insect specimens for exhibition
Insect specimens for exhibition are mainly used for popularizing insect knowledge, teaching and visiting. The production method is to collect the insect specimens prepared by the various methods introduced above and arrange them in a special exhibition specimen box according to the order of insect life development, such as eggs, larvae instars, pupae and adults, etc. Then put materials related to this insect into the box: such as leaves of damaged plants, natural enemies, photos of prevention or utilization, etc. By visiting a box of exhibition specimens, one can understand an overview of an insect's life and its relationship with the external environment and natural enemies. In order to increase the audience's emotion and appeal, a natural background can be set off in the box. The arrangement of damaged plant and insect specimens in the exhibition box should try to maintain their natural posture and shape, in order to achieve both beauty, vividness and practicality.
When making adult insect specimens in exhibition boxes, if the species needs to spread its wings, it is not necessary to pierce and fix it with an insect needle. Instead, place the specimen with the back side facing downwards, flat on the posture setting table, and use the tip of an insect needle to pin the chest to spread its wings to form a posture. After drying, pull out the insect needle and stick it in the appropriate position in the exhibition box as required. Or put cotton, foam plastic and other soft materials on the bottom of the box, place the specimen flat on it, close the lid and press it tightly. Some specimens can be made into a side three-dimensional ecological shape. Then use insect needles to nail the insect specimen sideways to the shaping table, adjust the shape according to the natural ecological shape, and remove the needles after drying for later use. The larvae, eggs or pupae in the exhibition box can be produced by the aforementioned larvae blowing and drying method. Injection method can also be used. First, place the specimen in a glass bottle with good texture, and put cotton or foam plastics of various colors under the specimen to prevent the insect body from rolling in the glass bottle, and then use an alcohol blowtorch or oxidizing spray. Use a fire mouth to soften the open end of the glass bottle, use tweezers to pull it into a very small opening, use a syringe to inject the preservation solution, and then use fire to soften the opening to heal it. Secure in place in display box as desired.
The method of packing specimens in glass is similar to packing specimens in exhibition boxes, but instead of using cotton, glass is used on the top and bottom of the specimen. Used to display individual moths, butterflies or other insects, either entirely in glass or with a cardboard frame. Its size can depend on the size of the specimen. There should be space around the specimen, and space between the upper and lower glass that can accommodate the insect body and feet. When making large specimens such as hawkmoths, it is best to use the frame method with cardboard; when making small insect specimens, the all-glass method can be used.
The materials used in the all-glass method are glass: transparent glue and combination buckles. The glass can be cut by yourself with window panes. For transparent glue, quick-drying general glue can be used. The combined buckle can be used with 19 mm wide electrical buckles. The production procedure is as follows:
(1). Glass-mounted exhibition specimens must first be positioned on the posture setting table, so that the insect specimens face up, spread the wings and antennae into a standard posture, and press the feet close to the body to reduce the thickness.
(2). Cut two single pieces of window glass of the same size as the cover and bottom. The size should be at least 6 mm larger than the surrounding sides of the open specimen. Cut the filling glass block (use single or double glass) to provide a gap for the insect body. The filling glass should be the same size; its length should be equal to the size of the cover and bottom glass (usually slightly smaller); there should be room in the center Two or three times the width of the insect. and wipe the glass clean.
(3). Place the bottom glass on a clean surface and use a camel hair brush to brush off the lint on it. Put a bead of clear glue on each outer corner of one end. Place a piece of filled glass on the base, aligning the sides, tamping down with the handle of a brush and removing any excess glue. Continue to glue another piece of filled glass, aligning both sides and having the same thickness. Stop for a while after each layer is glued. Apply less glue to prevent the glue from spreading inward and affecting the appearance of the specimen.
(4). After the filling glass is glued, place the pre-made specimen in the center, put glue on the four corners of the glass, and glue the cover glass in place. Pay attention to keeping the specimen straight. Compact it and put something not too heavy on it, it will stick firmly in about 15 minutes to 1 hour. Combined buckles are added on the four sides. The clip covers the sharp edges of the glass and seals the specimen. Glue the label on the top. Store in a dry place to avoid mold.
Glass specimens with cardboard frames are made similarly to the above method, but only a pair of glass blocks are used for filling, and the rest of the gaps are supported by the frame. There are two layers of cardboard frames on each side; the outer layer can be thinner, but the inner layer should be made of thick packaging cardboard (cardboard that cannot be wrinkled). The inner cardboard layer should be at least as thick as the glass, and if necessary, the second and third layers of cardboard should be glued together. The cardboard strips form the inner wall of the specimen box and are high enough to accommodate the insect's body and feet. The glass and cardboard strips must be carefully and correctly cut to size in order to make a good specimen.
If a large number of such specimens need to be produced, standard-sized glass blocks can be used, making cutting, installation and storage easy. Two or three specimens or one horizontal row can also be placed in it. Two or three sets of filling glass can be used. The glass on the side is narrower than the one in the center. But the insect specimens must be the same size, otherwise small specimens will easily tilt. The cover glass must be pressed tightly to keep the specimen upright. There is also an exhibition specimen made of transparent plastic plates, which can put moths, butterflies and other insects between two thick transparent plastic plates for exhibition purposes. The method is to heat a thick transparent plastic plate to make it have a concave shape in the middle, place the specimen after spreading its wings into the concave surface, then put the two plastic plates together, and seal the surrounding edges with acetone or other sealing substances. .
The damaged green plant specimens in the exhibition box are made of copper acetate powder, slowly added to 50% acetic acid solution, and stirred with a glass rod until it reaches a saturated state, which is used as the original solution. Dilute with water when using, the ratio is 1:4. When making, put the diluent and plant specimens into a large beaker at the same time and heat it until it boils. The plants will lose their green color and turn yellow. If the heating is continued, the green color of copper acetate will soak into the plant tissue and turn green again. Stop heating when the color is the same as the original color. The heating time depends on the thickness, softness and hardness of the plant leaves. Take out the specimen and rinse it in clean water until it no longer appears green in the water. Use tweezers to pick it up, drip all the water on the leaf surface, and place it in a plant specimen folder to dry before use. If you need to soak and preserve plant specimens, just rinse them and soak them in 50% formalin solution for long-term preservation. If the damaged plant specimens are of other colors, they should be collected and placed in rough absorbent paper in herbarium folders (turn them frequently for ventilation to prevent mildew). After drying, paste them on drawing paper, and then use oil color to color them according to their original colors. Both real and vivid.

For large-scale exhibitions or insect specimen exhibitions in museums, you can use a large glass frame or a wall-mounted kitchen window, with forests, mountains, green grass and flowers as the background. Arrange various prepared ecological insect specimens in appropriate locations. Butterflies and dragonflies flying in the air can be hung with fine silk or horsetail hair. Then a small fan is installed in a hidden place to blow, and butterflies and dragonflies sway, lifelike, and have a unique natural style.
Through the series of hard work mentioned above, you will have insects made into boxes of beautiful, novel and fascinating specimens.
Put the specimen box in the specimen cabinet for preservation. If there are too many specimens, a special storage room - an insect specimen collection room is needed.
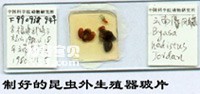
With the in-depth development of insect classification, identifying species only by external morphology is far from achieving the goal. It is also necessary to further conduct comprehensive identification based on the characteristics of male and female external genitalia, which is more reliable, especially for some small insects and The identification of closely related species cannot be distinguished at all by appearance, and can only be distinguished based on the characteristics of the external genitalia. Therefore, it is of great significance to use the relatively stable characteristics of insect external genitalia to classify insects of certain orders. To extract the external genitalia, first select representative male and female individual specimens, take out the external genitalia, and seal them on a glass slide after processing. For careful observation under a microscope, or for taking pictures with an electronic scanner for study.
4. Extraction method of external genital specimens
In the past, the method of removing the external genitalia of insects was generally to cut open the abdomen or cut off the end of the abdomen, decontaminate it by boiling it in sodium hydroxide, and then take out the external genitalia. This method obviously cannot maintain the integrity of the original insect specimens, especially for type specimens, which becomes an irreparable defect. If it is required to completely remove the external genitalia while maintaining the appearance of the specimen, then it is necessary to master certain external genital extraction techniques and some simple tools.
There are many types of insects, and the structure of the external genitalia varies greatly depending on the group and type. Therefore, the extraction and preparation methods of external genitalia of different groups of insects should also be treated separately.
(1). Method for extracting external genitalia specimens of lepidopteran insects. For fresh adult insect specimens that have just been killed by poison or within 24 hours after death, just place the specimen ventrally upward on a cork dissecting table and use a binocular dissecting microscope to extract it. Hold the fine crochet hook straight up with your right hand, press the small cork table with your left hand, use your left thumb to support the needle body, and extend the tip of the needle hook upward along the center of the inside of the ventral surface of the tail end of the specimen. The depth of the extension depends on the size of the insect body. Generally, it reaches about a quarter of the length of the abdomen, and the tip of the needle hook is turned downward. In this way, it just hooks the ossified part of the abdominal inner base of the male clasp. Then pull it outward evenly, and soon you can see that both ends of the holder are evenly stretched out and gradually exposed. This shows that the pulling position and direction are appropriate, and then continue to pull outward until the completeuntil the ground is pulled out. If you cannot see the holder evenly separating or moving up and down when you pull it out, it means that the position of the pull is improper. If you pull it out again, the external genitalia will be damaged. In this way, the needle hook should be extended inward and its direction and position should be adjusted. The depth reached by the crochet hook must be appropriate and the position must be correct. This is the key to obtaining a complete specimen. Using this method to prepare the male external genitalia is very effective and complete, and even the seminal vesicles can be pulled out completely. If it is a female specimen, as long as you are careful, you can pull out the cyst duct, ductal band and mating sac completely, and the scales or hairs on the abdomen are well preserved, and you will not be able to remove the external genitalia by pinching it with your thumb and index finger. This causes a large amount of scales and hair to fall off. If it is a dried specimen that has been preserved for a long time, it must be softened. The length of time for softening depends on the storage age and different types. For example, at room temperature of around 25C0, male specimens of armyworms from the family Noctuidae, elm poisonous moths from the family Scutellariaceae, red-sleeved light moths from the family Scutellariae, and pine caterpillars from the family Spodopteraidae were compared after being soft for 48 hours. Use a crochet hook for the four moths. Even if the abdomen is pressed lightly, it can sink slightly, but the lantern moth can barely pull it out completely. The other three types can only pull out the strongly ossified belly and end of the cradle, while other parts are lost in the abdominal cavity. If the hook is pulled repeatedly, the external genitalia will be pulled apart. The above-mentioned four specimens that had been soft for 72 hours were soft as before with a crochet hook on their abdomens. They could be completely removed by hooking, but it was easier for the lamp moth, followed by the noctuid moth, and the poisonous moth and dead leaf moth were worse.
Different softening times have different preparation effects. The softening time is slightly shorter, and the abdominal intersegmental membrane is not easily stretched, but some types are more difficult to hook. If the softening time is too long, although it is easier to pull out the external genitalia, the abdominal intersegmental membrane is easy to be pulled apart, and it is not easy to recover after drying.
The softening time of dried specimens is closely related to the storage period. The shorter the storage period, the easier the preparation. The longer the period, the more difficult it is. It also depends on the size of the insect. Generally, it needs to be softened for more than 48 hours. The longer the softening time is, the temperature in the softener should be slightly lower to make the humidity smaller, so that water vapor will penetrate into the specimen more slowly and avoid the hair and scales on the insect body. They are stuck together due to high humidity (to prevent mold growth during the softening process). Before hooking the four moths mentioned above after they were soft, cut 5 mm long openings in the webs at the end of the abdomen, and then use a crochet hook to pull them out. The result was no benefit to any moth species. On the contrary, it is easy to tear the abdomen and it is difficult to press it together. Even if it is glued, it will lose its original shape.
(2). The extraction method of external genitalia specimens of Hymenoptera mainly uses sawflies as materials. The base of the female external genitalia of Sawfidae insects is strongly ossified and must be cut with scissors before being removed. The specimens used must first be properly softened (specimens killed by initial poisoning or within 24 hours of death should be used as fresh specimens). Specimens that take too long to soften are easily deformed and faded, especially smaller specimens whose body walls are too soft and difficult to work with. If the softening time is too short, the abdomen of the specimen may be easily broken or shattered. Generally, it only needs to be softened for 24 hours.
During operation, place the soft specimen on a small cork table with the belly facing up. Use two thin insect needles to be inserted crosswise on the cork table to press the abdomen so that the body of the specimen is slightly sideways and the genitals are slightly to the right. Hold the cork table with your left hand, hold the scissors with your right hand and use your left thumb as a support, extending toward the abdomen. The scissors should have the inner blade at the bottom and the outer blade at the top to prevent damage to the base and guard of the genitals. The scissors should be inserted between the seventh section of the abdominal web and the ninth section of the back plate, but the angle should not be too straight or too forward or backward. Cut continuously before passing, and it is not easy to stretch people or reach under the negative flap after passing. After the position is set, first cut to the right, then to the left. If the position of the cut is correct, the end of the genitals will tilt upward. Then turn your wrist so that the scissors extend horizontally and make a third cut between the negative flap and the slide. If the left and right scissors are not cut well, the genital end will not tilt up. You can use a needle to pull out the genitals to move the negative flap and reveal it before cutting the third scissor.
The female ovipositor of sawflies is composed of four lobes, the pair on the back is the second negative lobes, and the pair on the ventral surface is the first negative lobes. The two left and right pieces of the second negative flap are at least partially connected on their backs and are not easy to separate, while the two pieces of the first negative flap are easy to separate. The connection between the first and second negative flaps is not adhesion and hooking, but interlocking between grooves and convex phases, with the second negative flap on the outside and the first negative flap on the inside. It is very easy to damage the two negative flaps when they are separated up and down. If the two negative flaps are pushed in opposite directions, they will be easily separated. The first and second negative flaps are born on two carriers, while the third negative flap is significantly thicker and wider, which is used to protect and support the first negative flap to play a greater role during egg laying. When laying eggs, the two negative flaps can freely expand and contract through the sliding gap in the middle. Use the saw on the first negative flap to cut through the plant tissue and lay eggs. Therefore, in order to completely cut off the female external genitalia of sawflies, it is necessary to fully understand its structure.
The male external genitalia of insects of the family Sawfly is thick and concentrated, making it easier to remove. For fresh specimens, just put the ventral side up on the cork workbench, and insert the crochet hook parallel to the lower genital plate under a binocular dissecting microscope. Depending on the size of the body, turn the tip of the crochet hook down about 2 mm deep, and then slowly pull it out to remove it completely. Specimens that have been dried and stored for 2-4 years can be taken out smoothly as long as they are still soft for 24 hours.
(3). Methods for extracting specimens of external genitalia of Coleoptera insects. The male external genitalia of Coleoptera insects have a relatively strong degree of ossification in general species, and are longer than wide in shape. Therefore, for fresh specimens within 24 hours after killing, just insert the crochet needle from the inside of the abdominal end of the web. The depth of penetration depends on the size of the insect body. Then half-turn the crochet hook so that it moves sideways to the center, and then slowly pull it outwards to pull it out completely. After drying, the specimen is still soft (the softening time is preferably more than 24 hours). Because too much intra-abdominal fat is involved, the abdominal segments can easily be elongated or broken. Use scissors to cut on both sides of the web, but the cuts should not be too deep to avoid damaging the genitals. All can be taken out by cutting and then pulling.
Soak the male external genitalia of beetles, scarabs and other larger carabids in the abdomen for about 20 minutes to completely soften them. Use the thumb and index finger of your left hand to hold both sides of the end of the abdomen (ventral side facing up), pinch gently, and a transverse seam will open between the ninth and tenth sections of the abdomen. Hold the tweezers in your right hand and lift up the ninth web, and you will see the tips of two horny lateral processes of the penis exposed. Just use tweezers to hold it and gently pull it out to pull out all the genitals and soak them in 75% alcohol for later use.
5. Processing and storage
There are many methods for processing and preserving insect external genitalia for research. Among the commonly used methods, the better ones are:
1). Preserve the external genitalia of insects by making slices. Generally speaking, the horniness is relatively strong. Therefore, it is best for the extracted materials to undergo dehydration and transparency procedures before being sealed in a glass slide with Canadian gum for storage. Since the prepared genital slides have been separated from the original specimens, in order to prevent confusion and loss, the slides must be labeled exactly the same as the original specimens, indicating the type, collection location, date and the original number on the specimen, and then Store in a slide specimen box. The production method is as follows:
(1) Canadian gum tableting method
Place the dissected insect external genitalia in a 10% potassium hydroxide (KOH) solution, heat it in a water bath for a few minutes (the time will depend on the degree of ossification of the insect body), remove unnecessary muscles and fat, and wash with water. Clean, stain with magenta, and store in 75% alcohol for later use. Various concentrations of alcohol (85%, 90%, 95%) are used for dehydration during filmmaking. Each concentration change must take a long time (usually about 15 minutes). For materials with strong ossification, the time should be extended in each concentration. Then put it in 100% alcohol (anhydrous alcohol) and soak it for about half an hour or longer. Every time you change the concentration, use filter paper or absorbent cotton to absorb the original alcohol. This step above is called dehydration. The reason why the sealed specimen needs to be dehydrated is because gum and water cannot dissolve together. If the specimen with moisture is sealed in glue, it will become turbid or deteriorate the specimen, making it difficult to preserve it.
The dehydrated specimens are then placed in xylene to replace the alcohol and provide transparency. When the specimen is moved to xylene, if the solution is turbid, it means that the water has not been removed, and it should be returned to 100% alcohol for processing. The time in the xylene solution should not be too long. As long as the insect body is completely transparent, it can be moved to the glass slide. Place the insect body in the correct position and suck away excess xylene from the edge of the specimen. Immediately add Canadian gum and cover with a cover slip. You must be careful when covering the cover. Use tweezers or your hands to hold one end of the cover slip, tilt it toward the slide, so that one end of the cover slip touches the gum first, and then quickly release your hands or tweezers so that the cover slip naturally sticks to the slide. On the glue. This avoids the formation of air bubbles. If bubbles still occur, use a needle to gently press the cover slip, or slightly heat it under the slide. But it is best to wait for a few hours or place it in a 50-degree thermostat for a period of time, and the smaller bubbles will disappear naturally.
If the right amount of gum is added, after the cover slip is placed, the gum will just overflow around the cover slip. If there is still a place under the cover where the gum has not spilled, it means that the glue has not been added enough. The glue should be dripped on the edge of the missing glue area under the cover slip with a pin in time, and the glue will naturally penetrate and heal with the glue under the cover slip. When adding glue, be sure not to drop glue on the cover sheet. After covering the cover slip, write a temporary label on one end of the slide and place it in a stable, clean but ventilated place. It is best to place it in a drying box with a glass cover on top and a ventilation screen below. You can also place the slides in a drying tray made of cardboard with compartments between each slide, and place them smoothly in a clean bookcase to allow them to dry naturally. After 10-15 days, the overflowing glue around the cover slip has begun to dry and solidify, and you can start to trim it. First, use a small knife to scrape off the excess gum on the slide, or use a small brush dipped in a little xylene to gently wipe off the gum ( But do not touch the cover slip), clean the dust on the slide, and attach the official label, then a slide is considered ready. If you see a white mist around the specimen under the cover slip before trimming, it is caused by dehydration. This kind of slide specimen cannot be used. If it is a rare specimen, the entire slide should be soaked in xylene immediately, the glue removed, the specimen taken out, and then dehydrated and made transparent again. If the glue used when sealing the slide is too thin, the evaporation of xylene will cause a gap under the cover slip during drying, which is called degumming. At this time, you can first drop a little xylene into the gap under the cover piece to dissolve the edge of the original glue, and then use a dial needle to drip the glue into the glue until it flows naturally. Once the technology is proficient, many of the above shortcomings will naturally be overcome.
Canadian gum is a finished product bought at a chemical reagent store. If it is dry gum powder, you can first grind it into a clean glass dish, add an appropriate amount of xylene to dissolve it, and put it into a narrow-necked bottle for later use.
(2) Glycerin fish gelatin tableting method
First cut the isinglass into small pieces and soak in distilled water for 2 hours. Boil the isinglass in boiling water until the isinglass blocks are completely dissolved, add glycerin and carbolic acid, stir with a glass rod to speed up the mixing, filter while hot, and store in a colored bottle. The formula of glycerin isinglass is:
4 grams of clean isinglass
70ml of distilled water
80ml pure glycerin
2 ml of carbolic acid
This kind of glue will solidify after cooling. When using it, put the glue bottle in hot water to dissolve it. When making the film, first place the specimen in a mixture of half and half glycerol and water for a period of time. Wipe the slide clean and warm it, place the specimen in an appropriate position, then straighten it, add glycerin isinglass to the specimen, cover it with a cover slip, and label it.
Using this glue to make tablets can omit the dehydration procedure, and the effect is very good for general observation. However, when used in hot and humid areas and stored for a long time, the glue on the edge of the cover may become moldy. You can use a brush dipped in a little carbolic acid to remove it.
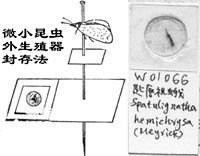
2). For sealing and preservation, cut a rectangular piece out of thick paper, punch a circular hole in the center of one end, first stick one side with transparent cellophane tape, and stick the processed external genital specimen on the inward side of the tape. On one side, use another piece of tape to stick it, or first use two pieces of tape to seal the material in the middle, then use two pieces of square paper with round holes to glue it in the middle, and then put it on the paper piece Indicate the species, collection date, etc., and insert them on the label of the original specimen.below. Sealing and preserving insect external genitalia is suitable for smaller species. The advantage of this method is that the external genitalia does not leave the original specimen and can be removed for observation under the microscope at any time. The disadvantage is that after being stored for a long time, the tape loses its original viscosity and becomes brittle and cracked, damaging the material.
You can also put a cover slip on a thick piece of paper with a round hole punched, drop glue on it, put the insect external genitalia that has been dehydrated and transparent, and then seal it with a quarter-sized cover slip. . This method takes into account the advantages of both production and sealing methods.
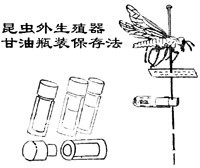
3). Bottled preservation is to soak the insect external genitalia materials that have been observed and studied using the glycerol temporary packaging method, soak them in glycerin, put them in a small glass tube, insert them into an insect needle with the original specimen, and take them out at any time in the future. Soaking in glycerol can also increase the transparency of the specimen for easy observation; the disadvantage is that the glycerin will overflow through the bottle stopper and evaporate, so pay attention to check and replenish it. It can also be sealed in vials made of polyethylene. Because polyethylene is not affected by ordinary acids and solvents and is not easily broken. The bottle stopper can be made of white silicone rubber. The stopper is slightly sloped to fit snugly into the bottle. Pierce the stopper with a needle at an angle to prevent glycerin from flowing out. This vial containing insect external genitalia has a diameter of 5.5 mm and a length of 17 mm with a stopper.
7. Preparation method of Lepidoptera wing vein specimens
The use of wing veins as a basis for classification is particularly common in Lepidoptera. In order to make the wing veins clear and easy to see, the wings must be made into a highly transparent glass slide and the wing veins must be dyed for easy observation. The glass slides made by bleaching method are simple and easy to use, eliminating the need for painting scales.
1). During the bleaching and production process, first remove the complete front and rear wings from the insect body and immerse them in 75% alcohol solution to moisten them. Then move the wings to a dilute hydrochloric acid solution of 1 part water and 9 parts hydrochloric acid for 1-2 minutes, suck off the dilute hydrochloric acid solution, and drop it into a bleach solution of 0.4 g bleaching spirit plus 10 ml distilled water. By repeatedly going back and forth in dilute hydrochloric acid and bleaching solution many times, the scales on the wing surface will gradually be bleached and fall off. When moving from dilute hydrochloric acid to bleaching solution, it is common to see many bubbles on the wing surface, and the thinner wings will also curl up. In this case, you can use a brush to press lightly to remove air bubbles. If you check under a microscope that the scales on the wings have been rinsed and there are still bubbles on the upper and lower surfaces of the wings, you can move them into 75% alcohol and use a soft brush to brush and press on the wing surface to completely remove the bubbles. If there are still opaque parts or scales that have not been bleached or removed, you can return to the previous bleaching solution and process them sequentially.
In order to make the veins on the wings more obvious, put the washed wings into a small stained glass dish containing eosin or acidic fuchsin, and heat them in water for 5-10 minutes (the degree is when the wing veins are completely dyed red) ), take it out and transfer it to three concentrations of alcohol: 75%, 95%, and 100% for dehydration. Absorb the alcohol, inject xylene to make it transparent, then place it on the slide, add Canadian gum, and cover it with a coverslip.
Regardless of the steps of bleaching, dehydration, clearing or cleaning, you must be particularly careful to prevent the wing membrane from wrinkles. If the above phenomenon occurs, do not touch it with tweezers or a needle, but use a soft brush to help flatten it. When replacing various liquids, it is best not to move the wings, but use a straw to change the liquid in the original glass dish, and use absorbent paper to absorb it.
2). The bleaching and dehydration method on the glass slide is used to make small moths such as Mai'e and Cai'e. The above method may also damage the wings; then use the bleaching and dehydration procedure directly on the slide. First, remove the front and rear wings under a binocular dissecting microscope, lay them flat on a clean slide, first use a straw to gently drop a drop of 75% alcohol on the wing surface, and blot it dry with absorbent paper after 2 minutes. Then use another dropper to suck the hydrochloric acid solution and drop it on the wings. After 2-3 minutes, suck it off. Drop the bleaching semen on it. After 2-3 minutes, suck it off. Then drip the dilute hydrochloric acid solution. Repeat several times until the scales are transparent. fall off. Drop distilled water several times to wash away the dilute hydrochloric acid and fallen scales, then add a drop of glacial acetic acid, replace it 4-6 times within 10 to 20 minutes, blot it dry with absorbent paper, and add xylene to make it clear. If you see that the dropped xylene solution is turbid, you need to replace it several times. When it is completely clear, suck up the xylene and add a Canadian gum cover to seal it. When changing the liquid each time, the solution should not be dropped too much to avoid floating and shrinking the wings. When changing the medium, be sure to absorb the pre-fluid to avoid dehydration and incomplete sealing. White mist will appear after the transparent slide is not completely sealed, which will affect the microscopy work.
animal tags:
We created this article in conjunction with AI technology, then made sure it was fact-checked and edited by a Animals Top editor.
you may also like

Body length is about 7 mm, grayish brown. The head tube is shorter and has a longitudinal groove on its surface. The wing elytra are slightly oval, with slightly pointed ends. The surface is densely covered with yellow-brown hairs and has brown hair patches, forming irregular markings and ten...

Although some butterflies are of the same species, they can appear in different colors and shapes in different seasons. For example, the summer form of the peacock-eyed butterfly Precis almana L. has no obvious sharp corners and clear eye stripes in the wings; but its autumn form has The shar...

Dragonflies are a type of insect belonging to the order Odonata and family Odonata. They undergo complete metamorphosis during their evolution, molting multiple times from the larval stage to the adult stage, and undergo significant changes in morphology. The following is a detailed introduction to...
")
1. Water turtles The terrapin looks like a dragon louse and lives in the same water ecological environment as the dragon louse. Its body is streamlined and its dorsal and ventral surfaces are arched. However, its back is more protruding than that of the dragon louse, and...
")
This species is also called the pine bark weevil and the pine bark weevil. The adult body length is 7 to 13 mm. The body and elytra are both dark brown. The back of the chest is irregularly covered with circular engraved spots of varying sizes. The antennae are knee-like, stalked, and are att...
")
1. The head structure of insects The head is the frontmost segment of the insect's body, which is the sensory and feeding center. The head is composed of several body segments that are fused together, with a hard outer wall to form a head shell. There is a pair of antenna...
")
Lice adults and nymphs feed on the host's body throughout their lives. The hosts are mainly terrestrial mammals, with a few marine mammals, and humans are also often parasitized. Lice are not only harmful by sucking blood, but also make the host itchy and restless, and can transmit many impor...
")
1. The Mystery of Hummingbirds (Long-billed Hawkmoth) Hummingbirds (class Aves) are as large as swallows and smaller than wasps. The plumage color is usually extremely bright, the beak is slender and tubular, and the tongue can be retracted freely. It often flies betwee...
Email: jsset668#gmail.com (change # to @) Please indicate your purpose of visit! Guangdong ICP No. 2022053326 XML| map| Chinese
-Animals Top")